前言
很多人对跨域有一种误解,认为这是前端的事,和后端没关系,其实不是这样的。说到跨域,就不得不说说浏览器的同源策略。
同源策略是由 Netscape 提出的一个著名的安全策略,它是浏览器最核心也最基本的安全功能,现在所有支持 JavaScript 的浏览器都会使用这个策略。
所谓同源是指协议、域名以及端口都要相同。
同源策略是基于安全方面的考虑提出来的,这个策略本身没问题,但是我们在实际开发中,由于各种原因又经常有跨域的需求,传统的跨域方案是 JSONP,JSONP 虽然能解决跨域但是有一个很大的局限性,那就是只支持 GET 请求,不支持其他类型的请求,在 RESTful 时代这几乎就没什么用。
而今天我们说的 CORS(Cross-origin resource sharing,跨域源资源共享)是一个 W3C 标准,它是一份浏览器技术的规范,提供了 Web 服务从不同网域传来沙盒脚本的方法,以避开浏览器的同源策略,这是 JSONP 模式的现代版。
在 Spring 框架中,对于 CORS 也提供了相应的解决方案,在 Spring Boot 中,这一方案得倒了简化,无论是单纯的跨域,还是结合 Spring Security 之后的跨域,都变得非常容易了。
一. 普通跨域解决方案
首先创建两个普通的 Spring Boot 项目,第一个命名为 provider 提供服务,第二个命名为 consumer 消费服务,第一个配置端口为 8080,第二个配置配置为 8081,然后在 provider 上提供两个 hello 接口,一个 get,一个 post,如下:
@RestController
public class HelloController {

    @GetMapping("/hello")
    public String hello() {
        return "hello";
    }

    @PostMapping("/hello")
    public String hello2() {
        return "post hello";
    }

}
在 consumer 的 resources/static 目录下创建一个 html 文件,发送一个简单的 ajax 请求,如下:
<div id="app"></div>
<input type="button" onclick="btnClick()" value="get_button">
<input type="button" onclick="btnClick2()" value="post_button">
<script type="text/javascript">
    function btnClick() {
        $.get('http://localhost:8080/hello', function (msg) {
            $("#app").html(msg);
        });
    }

    function btnClick2() {
        $.post('http://localhost:8080/hello', function (msg) {
            $("#app").html(msg);
        });
    }
</script>
然后分别启动两个项目,发送请求,观察浏览器控制台。可以看到,由于同源策略的限制,请求无法发送成功。
Access to XMLHttpRequest at 'http://localhost:8080/hello' from origin 'http://localhost:8081' has been blocked by CORS policy: No 'Access-Control-Allow-Origin' header is present on the requested resource.使用 CORS 可以在前端代码不做任何修改的情况下实现跨域,那么接下来看看在 provider 中如何配置。首先可以通过 @CrossOrigin 注解配置某一个方法接受某一个域的请求,如下:
@RestController
public class HelloController {

    @CrossOrigin(value = "http://localhost:8081")
    @GetMapping("/hello")
    public String hello() {
        return "hello";
    }

    @CrossOrigin(value = "http://localhost:8081")
    @PostMapping("/hello")
    public String hello2() {
        return "post hello";
    }

}
这个注解表示这两个接口接受来自 http://localhost:8081 地址的请求,配置完成后,重启 provider ,再次发送请求,浏览器控制台就不会报错了,consumer 也能拿到数据了。
此时观察浏览器请求网络控制台,可以看到响应头中多了如下信息: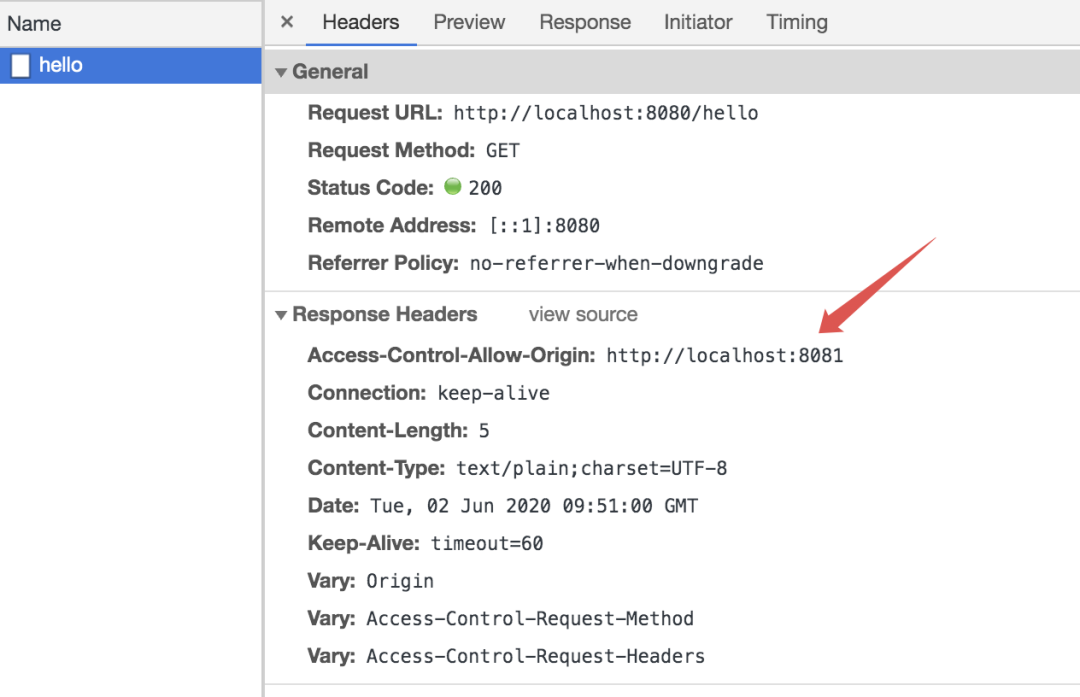
这个表示服务端愿意接收来自 http://localhost:8081 的请求,拿到这个信息后,浏览器就不会再去限制本次请求的跨域了。
provider 上,每一个方法上都去加注解未免太麻烦了,有的小伙伴想到可以讲注解直接加在 Controller 上,不过每个 Controller 都要加还是麻烦,在 Spring Boot 中,还可以通过全局配置一次性解决这个问题,全局配置只需要在 SpringMVC 的配置类中重写 addCorsMappings 方法即可,如下:
@Override
public void addCorsMappings(CorsRegistry registry) {
    registry.addMapping("/**")
            .allowedOrigins("*")
            .allowedMethods("GET", "POST", "DELETE", "PUT", "PATCH")
            .allowedHeaders("*")
            .exposedHeaders("access-control-allow-headers",
                    "access-control-allow-methods",
                    "access-control-allow-origin",
                    "access-control-max-age",
                    "X-Frame-Options")
            .allowCredentials(true).maxAge(3600);
}
/** 表示本应用的所有方法都会去处理跨域请求。allowedMethods 表示允许通过的请求数。allowedHeaders 表示允许的请求头。
经过这样的配置之后,就不必在每个方法上单独配置跨域了。
存在的问题
了解了整个 CORS 的工作过程之后,我们通过 Ajax 发送跨域请求,虽然用户体验提高了,但是也有潜在的威胁存在,常见的就是 CSRF(Cross-site request forgery)跨站请求伪造。跨站请求伪造也被称为 one-click attack 或者 session riding,通常缩写为 CSRF 或者 XSRF,是一种挟制用户在当前已登录的 Web 应用程序上执行非本意的操作的攻击方法。
二. 使用 Spring Security 的情况
如果你的 Spring Boot 项目中整合了 Spring Security,上面的跨域配置会失效,因为请求被 Spring Security 拦截了。
当引入了 Spring Security 的时候,我们有两种办法开启 Spring Security 对跨域的支持。
2.1 方式一
在本文第一小节的基础上,添加 Spring Security 对于 CORS 的支持,只需要添加如下配置即可:
@Configuration
@EnableWebSecurity
@EnableGlobalMethodSecurity(prePostEnabled = true)
public class WebSecurityConfig extends WebSecurityConfigurerAdapter {

    /**
     * 定义安全策略
     */
    @Override
    protected void configure(HttpSecurity http) throws Exception {
        http.authorizeRequests()
            .anyRequest().authenticated()
            .and()
            .formLogin()
            .permitAll()
            .and()
            .httpBasic()
            .and()
            // 开启跨域
            .cors()
            .and()
            // 关闭 csrf 保护
            .csrf()
            .disable();
    }

}
一个 .cors 就开启了 Spring Security 对 CORS 的支持。
2.2 方式二
去掉第一小节的跨域配置,直接在 Spring Security 中做全局配置,如下:
@Configuration
@EnableWebSecurity
@EnableGlobalMethodSecurity(prePostEnabled = true)
public class WebSecurityConfig extends WebSecurityConfigurerAdapter {

    /**
     * 定义安全策略
     */
    @Override
    protected void configure(HttpSecurity http) throws Exception {
        http.authorizeRequests()
            .anyRequest().authenticated()
            .and()
            .formLogin()
            .permitAll()
            .and()
            .httpBasic()
            .and()
            .cors()
            .configurationSource(corsConfigurationSource())
            .and()
            .csrf()
            .disable();
    }

    @Bean
    CorsConfigurationSource corsConfigurationSource() {
        UrlBasedCorsConfigurationSource source = new UrlBasedCorsConfigurationSource();
        CorsConfiguration configuration = new CorsConfiguration();
        configuration.setAllowCredentials(true);
        configuration.setAllowedOrigins(Arrays.asList("*"));
        configuration.setAllowedMethods(Arrays.asList("*"));
        configuration.setAllowedHeaders(Arrays.asList("*"));
        configuration.setMaxAge(Duration.ofHours(1));
        source.registerCorsConfiguration("/**", configuration);
        return source;
    }

}
通过 CorsConfigurationSource 实例对跨域信息作出详细配置,例如允许的请求来源、允许的请求方法、允许通过的请求头、探测请求的有效期、需要处理的路径等等。
「使用这种方式就可以去掉第一小节的跨域配置了。」
三. OAuth2 中跨域解决方案
还有一种情况就是 OAuth2 允许跨域,如果用户要访问 OAuth2 端点,例如 /oauth/token ,出现了跨域该怎么配置呢?
这个解决方案主要是配置一个 CorsFilter,我这里就把核心配置类贴出来:
@Configuration
public class GlobalCorsConfiguration {

    @Bean
    public CorsFilter corsFilter() {
        CorsConfiguration corsConfiguration = new CorsConfiguration();
        corsConfiguration.setAllowCredentials(true);
        corsConfiguration.addAllowedOrigin("*");
        corsConfiguration.addAllowedHeader("*");
        corsConfiguration.addAllowedMethod("*");
        UrlBasedCorsConfigurationSource urlBasedCorsConfigurationSource = new UrlBasedCorsConfigurationSource();
        urlBasedCorsConfigurationSource.registerCorsConfiguration("/**", corsConfiguration);
        return new CorsFilter(urlBasedCorsConfigurationSource);
    }

}
然后在 Spring Security 配置类 WebSecurityConfig 中开启跨域支持:
Configuration
@Order(Ordered.HIGHEST_PRECEDENCE)
public class WebSecurityConfig extends WebSecurityConfigurerAdapter {

    @Override
    protected void configure(HttpSecurity http) throws Exception {
        http.requestMatchers()
            .antMatchers(HttpMethod.OPTIONS, "/oauth/**")
            .and()
            .csrf().disable().formLogin()
            .and()
            .cors();
    }

}